The SRT seat belt tensioner GT allows for a limited budget to make the negative Gs (braking, ABS, shifting) credibly felt. It works with Simhub.
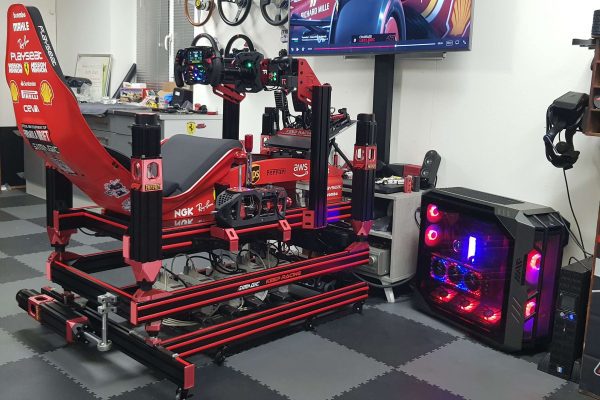
Final rendering :
Frankly very nice. At the first braking, we say to ourselves “Well, maybe it wasn’t worth the trouble…”. After a few laps we forget it. Then it’s when the belt doesn’t work anymore (yes because at the beginning, there were some tests…unsuccessful ^^) we can’t do without it anymore… we have again the feeling to play a video game, and not to drive a race car…
The system is quite precise, it engages immediately, and you can feel the braking difference between an F1 and a base car, you can also feel the activation of the ABS.
It’s probably not precise enough to use the information to dose the brake, like “ah it’s not working for me, I can brake more”.
NOTA BENE : The harness tensioner can be dangerous. At full power, it is very stressfull around the clavicles. Therefore, an emergency stop button must be installed.
Want to support this project ? https://www.paypal.me/leboisVR?locale.x=en
Summary :
1) Presentation
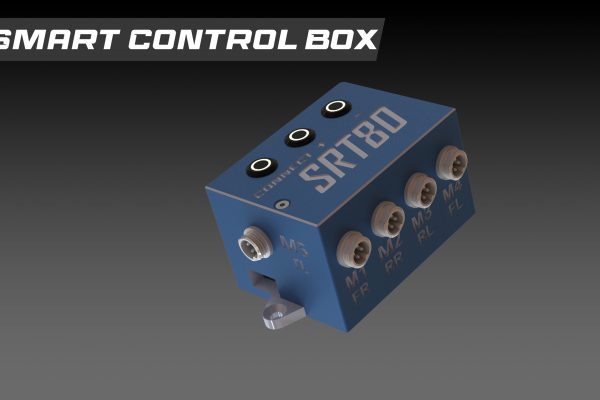
The harness tensioner consists of a harness (4 or 5 points), an electric motor, an electric motor driver, and an arduino board connected to Simhub.
2) Caracteristics
The motor pulls the belt backwards, it gives the impression of being thrown forward, especially in VR.
The 3D files are available on the download page.
3) Shopping list
Electronics :
- A 350W electric motor.(Amazon, Aliexpress, Ebay)
- 24V 15A 360W Power supply. It can good a good idea to add an emergency stop (Amazon, Aliexpress, Ebay)
- Motor driver 60A (Amazon, Aliexpress)
- Arduino Uno. Any clone will do. However, clones do not necessarily have the same dimensions, and therefore do not necessarily fit in the cases. (Amazon, Aliexpress)
- XT60H connectors. This connectors allow to easily disconnect the motor (Amazon, Aliexpress)
Mecanics :
- A 4-point harness. 5 points aren’t very comfy under the belt…you see what I mean ? (Amazon, Aliexpress, Ebay)
- 0,1kg PLA (Amazon)to print the rewinder.
- Bicycle brake cable (Aliexpress).
- SHF12 (it goes inside the drum. I recommand ordering from Industry&CNC because it comes with the 8mm adapter) (Aliexpress, Amazon).
Screws :
DIN912 :
- 2 x Vis M4x15. This Amazon kit contains the two screws
- 1 x Vis M4x40 (replaces the screw from the SHF12) (Aliexpress)
- 2 x Vis M6x25 (SH12 tightening)
- 1 x vis M8x20 with nut to tight the cable
DIN7991 :
- 4 x M6x15 to fix the motor on the motor mount.
- 4 x M8x20 to fix the motor mount on the aluminium profiles.There is two motor mount, one for 8040 extrusions, one for 10050 extrusions.
- 2 x vis M8x25 to fix the belt
4) Building instructions
IMPORTANT : The harness tensioner can be dangerous. At full power, it is very stressfull around the collarbones. It is therefore necessary to provide an emergency stop button.
Make all the connections with the power off.
Do all electronic tests without any parts on the motor’s shaft.
Once the tests have been carried out, and the belt installed, carry out the tests in 10% power increments.
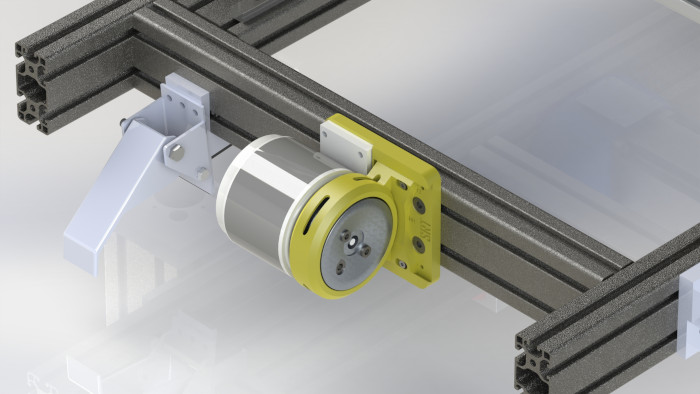
The belt drum is mounted on the motor shaft.
The connection of the power supply and the motor to the driver is indicated on the PCB.
A. Preparation of the driver :
- Unscrew the two screws
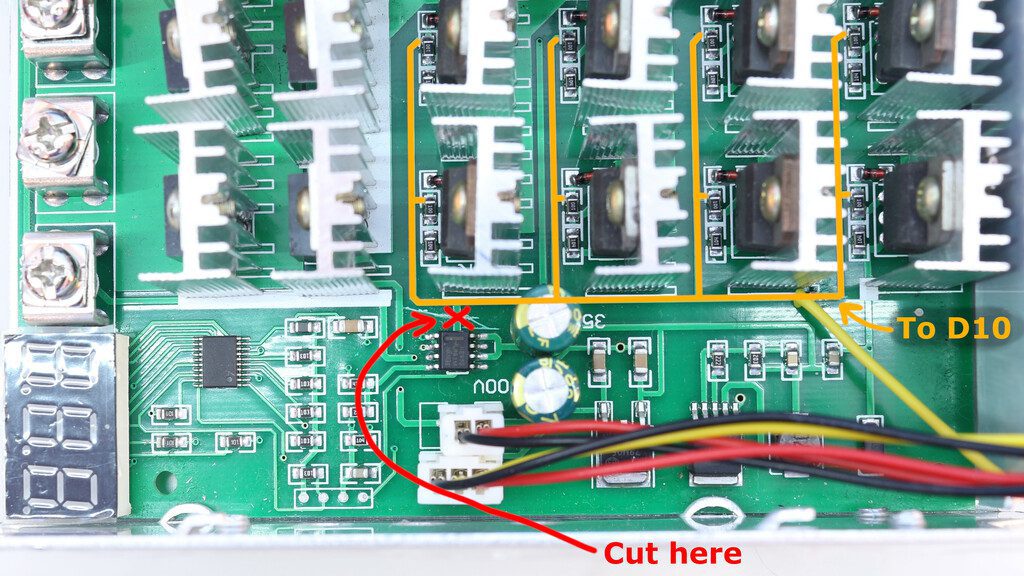
- Using a cutter, cut the track above the 8-pin transistor (ne555p). Still using the cutter, scrape the pcb in order to clear the yellow coloured track, then solder a wire to it, to be connected to pin 10 of the Arduino.

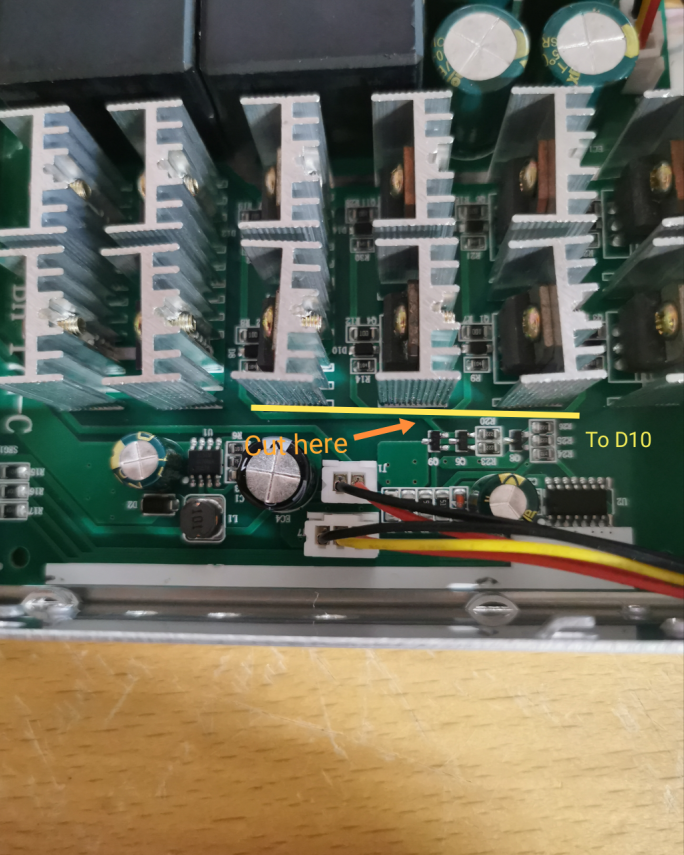
- You may have another version of the PCB (newer ?). In that case, do the same modification :

- Close the driver with the two screws. Connect the mass of the driver (Power -) to one the Arduino (GND) pins.
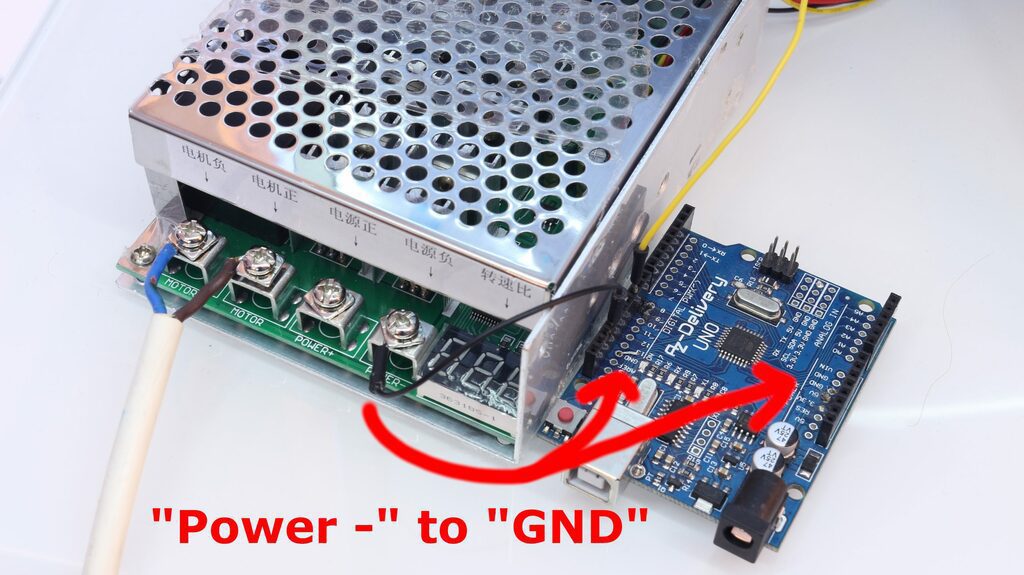
B. Setting up the Arduino card on Simhub :
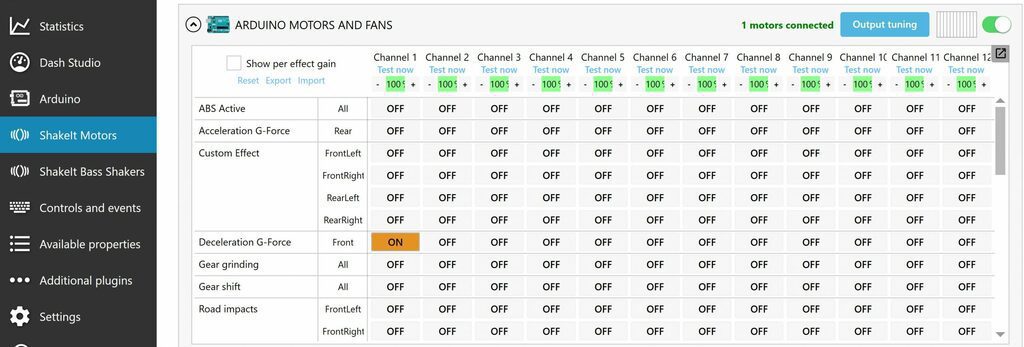
- On Simhub: We flashe an arduino with the PWM signal function (which is generally used to drive fans to make a wind simulator) and the deceleration function is associated with it.

- Our motor is associated with the deceleration function in the “motor output” tab of ShakeIt Motors :

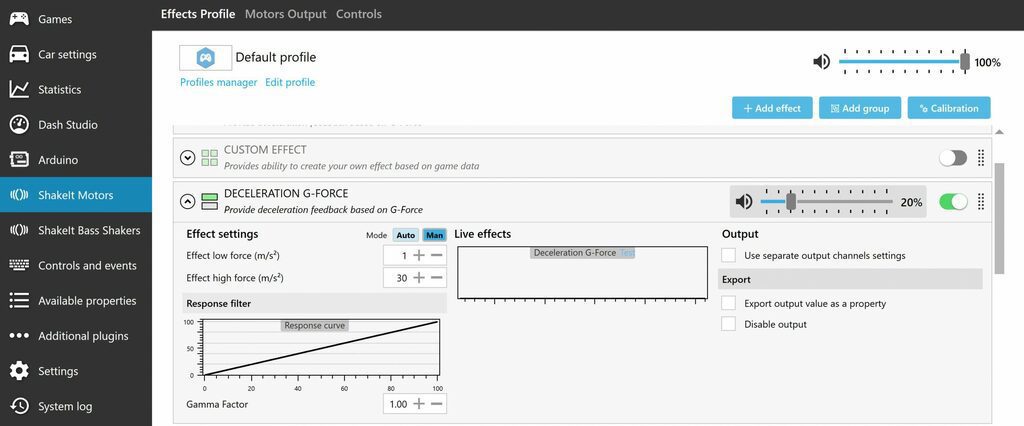
- The deceleration effect is set as follows. To be on the safe side, the power will be increased in 10% steps. Attention, when you test your settings in simulation, use a car with a high braking capacity (single-seater, F1…).


Dear Lebois,
A month ago I ordered the parts to build a seat belt tensioner. Now I see that the explanation has been updated. Is it possible to see/find the old version?
Best regards,
Leo
With this Motor driver/controller: https://nl.aliexpress.com/item/4000191062334.html?spm=a2g0s.9042311.0.0.2f0e4c4dWaNcR4
Hi the fact is that this driver was a bit too weak… avoid to use it at 100%.
About the explanation, please follow this video to link the driver to Arduino Pin10 :
https://youtu.be/ipFxYQkB5uw
If you have any problem, please come back.
Hi thanks for the feedback! Will try to build it next month. In the meantime I will order the new motor driver you described.
Thanks!
Dear Lebois,
I build the one with the new motor controller as described on this webpage. After completing 1 to 1 every step I can’t get the motor to work with the test button in Simhub. Any advice on how to troubleshoot this?
Best regards,
Leo
One thing I might have done wrong. Do I need to connect the Power – from the motor controller to both GND on the Arduino (indicated with the upper and bottom big red arrow on your picture).
one is enough. Both GND pins of the arduino are already linked together internally.
Hi ! Can you contact me on the facebook page and show me a picture of your wiring ? Just a bet : did you keep the potentiometer ? It acts as a power switch so we need to keep it.
Hello,
I built it like you said but it was working only 10 minutes. Motor stop working. Can you tell what went wrong?
I used stabilised power supply 24v 15A 350W.
Can you help me?
Please join the discord to find help. But you will have to give more informations.
Can you please sell me te full assembled kit?
Thanks!
I don’t sell anything 🙂
Nice Project! Does this work with Thanos as well?
I have no idea. I think we live in a world where everything can work with everything. But does it worth the pain ?
Hey Lebois, I was looking to build my own belt tensioner based on your project but i seems that the pictures you provided are no longer available in this page? Can you repost them pls if that´s ok?
Great work BTW!
It seems that I have a problem with the hoster… Meanwhile I uploaded all the pictures here.
BTW, I will test in the coming days a 24V/25A power supply. It should get rid of the problems I have on project cars2…
There is also quite a bit surprise coming 😉
Do you think a big capacitor on the power supply exit could help with the peak current caused on the motor start. Since when we aplly the brakes at the end of a straight ( for example) the G’s would spike to the max and consequently drive the motor to 100%.
I think it is just easier to use a stronger PSU. But yeah, a capacitor could help.
Ok, i will build my own design and share with you what i have learned from that. I will further investigate about this motor start current spike. I want to get a soft start but not slow, even though they are opposite things.
BTW when you first tested what percentage of the motor power you think fits best for simracing?
Hey Leobois, I tried my seatbelt tensioner today for the first time.
It works brilliantly! But the motor is REALLY loud. Do you had the same problem?
Do you need to do something in the software (SIMHUB)?
Once again, thanks for the project!
Hi Luis, can you contact me on my facebook page, and send me pictures of the simhub settings ?
Hi Leobois,
Would you think it’s possible to upgrade this to a two-motor belt tensioner? Then it’s also possible to replicate cornering forces and from products that have two motors that really seems to be a thing.
Also, can you shed some light on the upcoming surprise?
Hi ! In theory yes, you could use two motors, but I don’t think it would be efficient to replicate cornering forces. BTW, I am still working on it to improve everything, and I found out that it can also be very effective to replicate acceleration forces (but it is far more stressing for the electronics).
Hi, how do you program the relay added in the video?? Im just making your project.
Thanks! Great Job!!!
you set the pin in simhub and simhub does the rest
Perfect!! I didnt see the option under PWM FAN!
THanks! I let you know when it is finished.
Thanks Lebois for all of your work on this project! I was so inspired by it that I used it as an excuse to purchase my very first 3d printer. I’ve got the printer pretty well dialed in and am going to start printing the parts. I thought I saw your recommended 3d print settings for this somewhere – but now I don’t seem to be able to find them. Can you please provide your recommended settings for these parts (layer thickness, infill, etc.)?
Thanks so much Lebois! Happy racing!! Bob
Print settings are indicated in the 3d files names, although new name conversion from thingiverse made this thing looks weird. Check the names, 0.250 means 0.2 thickness with 50% infill.
Ha! Silly me! I thought I had seen them somewhere but forgot to go back and look at the actual file names. Think I looked everywhere except there. Much appreciated! Will let you know how it goes.
Thanks again Lebois! Cheers! Bob
Hi.
Have ordered this one
https://www.aliexpress.com/item/4001333117744.html
but they have send this one:
https://www.aliexpress.com/item/4001339399790.html
Will it work since i see that the difference is Forward & Reverse: Support vs one-way
It should be ok
please explain what you are telling use to cut on that board with the yellow line. You say to cut it but u dont say what, show anything cut or anything, I appreciate u helping but u need better directions and or pictures as this is horrible to try and learn from diy. When it is Diy you need to actually give the FULL directions which you didnt. please explain in more detail..
again you say all this but not a lick of true direction or pics showing anything cut, after cut or before cut. nothing…
Using a cutter, cut the track above the 8-pin transistor (ne555p). Still using the cutter, scrape the pcb in order to clear the yellow coloured track, then solder a wire to it, to be connected to pin 10 of the Arduino.
You may have another version of the PCB (newer ?). In that case, do the same modification
so i wont be able to do this, the directions are just not complete enough. maybe for some of you but if you literally are starting from 0 this cant actually be done. i can see someone that has played with racing sim maybe could but again no hit against you as you are only trying to help but just not enough true detail and pictures here. Do you not offer a service when I can just buy this ready to go. plug and play?
There is picture on that page. If that’s not enough, you can still ask for more help on the Discord.
But I’ll be honest with you. Give up, you definitely don’t seem to have the right “DIY” spirit here.
Hi all,
Bit late on the subject but i do have a question.
Has anyone tested the 350W motor coupled with a speed reducer linked to it ? (https://www.amazon.fr/Mophorn-magn%C3%A9tique-permanent-Vitesse-Carting/dp/B07QXK1M24/ref=sr_1_2?__mk_fr_FR=%C3%85M%C3%85%C5%BD%C3%95%C3%91&crid=2P47VP5CJRVC3&keywords=350w+dc+motor&qid=1668605262&qu=eyJxc2MiOiIxLjUyIiwicXNhIjoiMC4wMCIsInFzcCI6IjAuMDAifQ%3D%3D&sprefix=350+w+dc+motor%2Caps%2C161&sr=8-2)
The ratio is 9,7 to 1 so it will for sure give more torque, but I don’t know if it will impact the response time of the system.
The max rpm is 3000 so it grossly becomes 5 rotation/sec. It also depends on the diameter of the drum so…
Does somedy with this system installed knows if the max system if way less than 5rps ?
Thanks in advance !
Jules
I never tried
Hello. Thank you for always good blog강남 가라오케
Thanks 🙂
Thank you for your great blog길동노래방
For this fantastic article its really nice and this kind of blog is good thank you강남 달토
신림노래방알바-seoul Hello. Thank you for always good blog
Do you have the GTV3 for sale anywhere completed? I’m interested.
Hey, no but I will have p1 tensioners for sale
Is there a case for the power supply or driver board? I’d be nice to have the ps, driver and audrino in 1 case. Do you have this?