I am working on a 6 speeds gearbox that would be controlled by any clutch pedal !
Summary
1) Presentation
2) How to start
3) Shopping list
4) 3D files
5) Assembly
6) Arduino Code
7) Wiring
8) Mods
1 )Presentation :
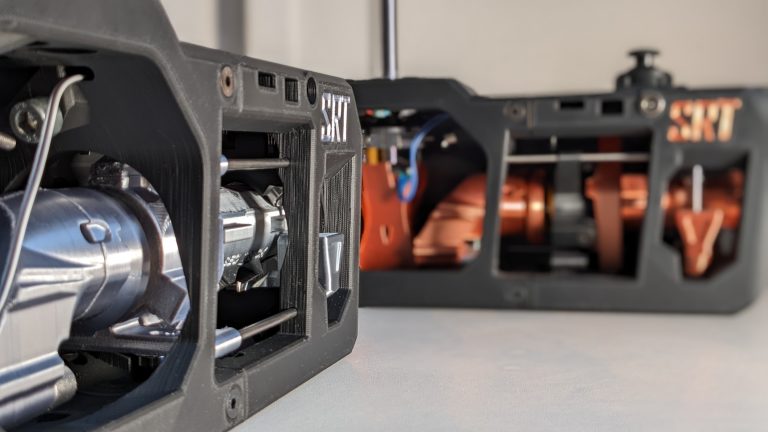
The best gearbox in the world:
- 6-speed H-box + reverse gear
- Sequential (we go from one to the other in 3 seconds)
- Clutch mode (optional): if you don’t press the clutch pedal, the gearbox stays locked (only in H mode)
- Multiple attachment points (from underneath and from the side)
- Adjustable front-rear and left-right feeling
- Adapter to mount a hand brake (P1)
- Possibility to connect pedals to it
- For about 220€.
The documentation of V9.1 is available on this page.
All the documentation is available on this page. Do not hesitate to ask for help on the Discord!
2) How to start
3)Shopping list
The shopping list is available here.
4) 3D files
The 3D files are available on this page. There is only one version of Body2, which is designed to support the eClutch mod. The eClutch mod and its shopping list are documented separately, see 8) The Mods
The body1 is available in two versions : one is compatible with the handbrake mod.
Each file contains a printing instruction in the form xx-xx. The first number is the precision, the second the filling. For example 02-30 means accuracy of 0.2 and filling at 30%. It is also useful to double the thickness of the walls.
The word “support” indicates that supports are required… The number that follows is the overhang angle to be entered in Cura.
I also recommend to activate the adhesion to avoid warping (part that comes off the support).
I recommend using the Cura slicer.
All the parts are in the ideal orientation for printing.
You will also find a step file which will allow you to integrate the cylinders in your CAD.
If you don’t own a 3D printer, you can order the 3D printed kit on my Etsy shop.
5) Assembly
Once all the parts are printed, you can start the assembly by following this tutorial.
6) Arduino code
The latest firmware is available on this page.
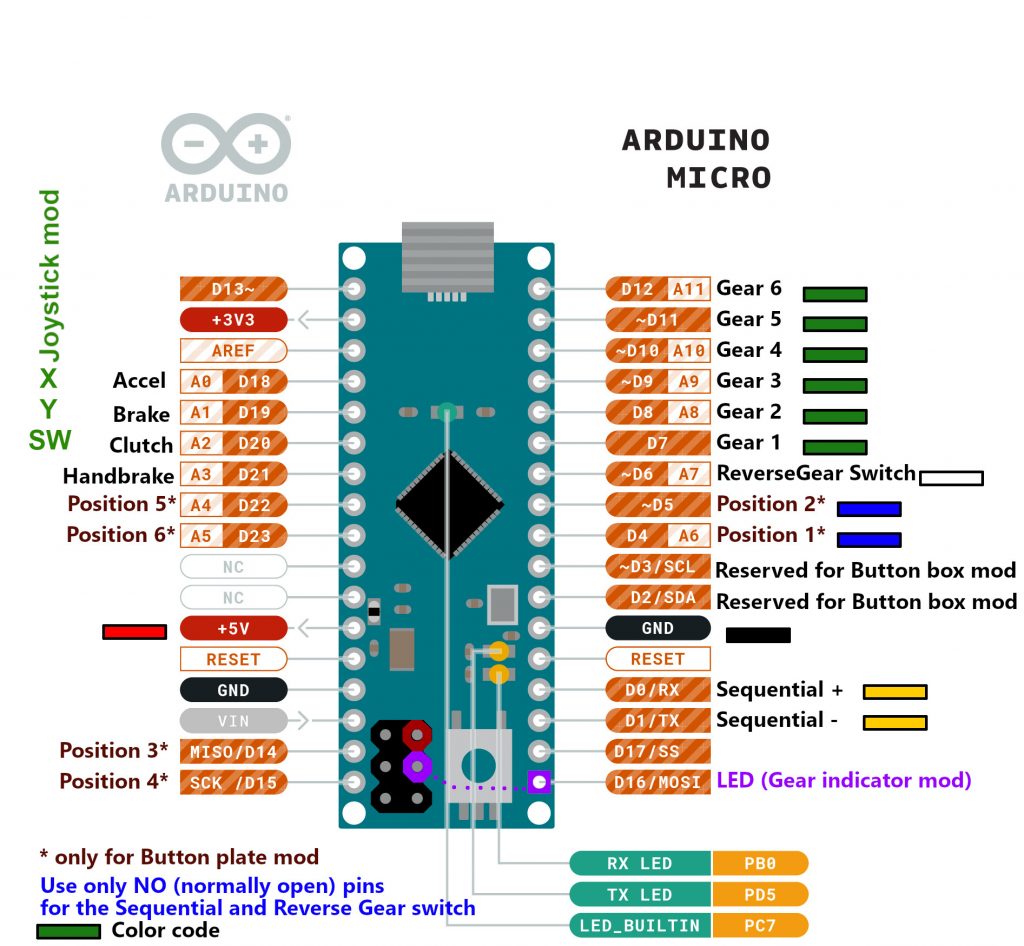
7) Wiring
It’s not essential, but here is the detailled wiring of the Arduino Micro :
8) The mods
Each mod has its own dedicated documentation. It is recommended to start by making a box without mods before adding mods.
- The eClutch mod : https://lebois-racing.com/mod-srt-eclutch-for-the-srt-gearbox
- The button plate mod : https://lebois-racing.com/mod-button-plate-for-srt-gearbox
- The gear indicator mod : https://lebois-racing.com/mod-gear-led-indicator
- The button box mod : https://lebois-racing.com/mod-button-box
- The Joystick mod : https://lebois-racing.com/srt-gearbox-joystick-mod
- The handbrake : https://lebois-racing.com/handbrake-mod
- The RHD mod : https://lebois-racing.com/rhd-mod-for-the-srt-gearbox-v9-1/
- The Hall Sensor Sequential mod : https://lebois-racing.com/mod-hall-sensor-sequential-for-the-srt-gearbox-v9-1/
You can also find all the mods developed by the community in remix of the project on Thingiverse.
A particularly popular mod is the one by Anthoneuh which allows to block the lateral movements of the lever in sequential mod.

Nice toys, let me know if they are for sale
where can i get the PCB for Arduino?
here
Thank you for providing this.
Quick question for you. When ordering Industry & CNC part kit how does one know what of the (3) Kits to buy? Looks like the only difference between the (3) is Shaft Length. Please advise & thanks in advance
main shaft length
Hi,about Main axle. have any detail about two screw holes on the axle,like location on the axle and size
you can get them on the step file
Thanks!!
Hello! I’ve read somewhere that v10 will be released in July but it’s not out yet. so is it canceled or just a delay ? thank you
release tomorrow 🙂