The eClutch mod allows the gearbox to remained locked when the clutch pedal isn’t pressed. It is done by a small servo motor, controlled by Simhub through the Arduino.
On the la Button Plate, the 13th function allows to enable or disable the eclutch.
Summary
1) Shopping list
- A servo motor MG996r(Amazon, Aliexpress)
- Power supply 6V 2A (Amazon, Aliexpress)
- Connector DC 5.5mm (Amazon, Aliexpress)
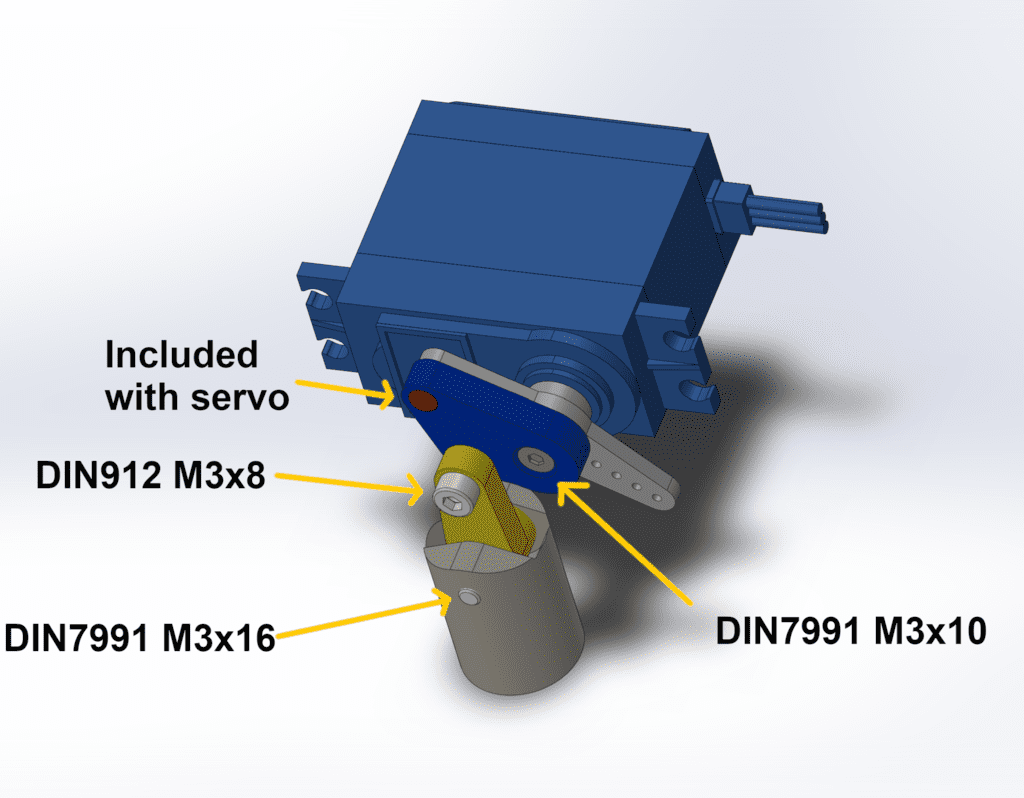
- DIN912 : 2 x M3x10
- DIN912 : 4 x M4x10
- DIN7991 : M3x8
- DIN7991 : M3x16
2) Assembly
For the assembly, please follow the following steps :
- Install the DC connector next to the USB exit
- Plugged the servo to the arduino
- Activate the mod in the code
- Connect the Arduino to Simhub
- Launch the game and go on track and wait for the clutch to be in locked position (you can press the clutch pedal to check if the motor is responding correctly).
- Install all the mechanism while the servo is still in locked position, while checking if the gearbox is still locked in this position.
You can then adjust the position on the plongeur while in locked position by changing the value :
#define LOCKED 130
The higher the number, the lower the plongeur goes. Check that the position is correct and that the servo isn’t forcing.
If the servo forces (it makes noise all the time), it will heat up and may deteriorate.
3) Wiring
The PCB of the V9 does not foresee a specific port for the servo motor, but it can be connected to the hand brake port:
Yellow : data (“signal” is written)
Orange : GND
The DC connector brings power to the servo (red +, brown -). The ground of the servo needs to be also linked to the PCB.
4) 3D files
The files are available on the Google Drive in the folder “mod eClutch”
5) The code
Before activating the function in the code, it is advisable to test the correct operation of the servo. For this we will use the example code provided with the Arduino software. Once the IDE is launched, go to “File>Examples>Servo>Sweep”. Before flashing the code, you have to modify the following line:

You need to use at least the v3.0
You need to replace :
//#define SRTeCLUTCH
by:
#define SRTeCLUTCH
Then you can select the pin on which one you want to plug the servo. By default it is plugged on the pin A3.
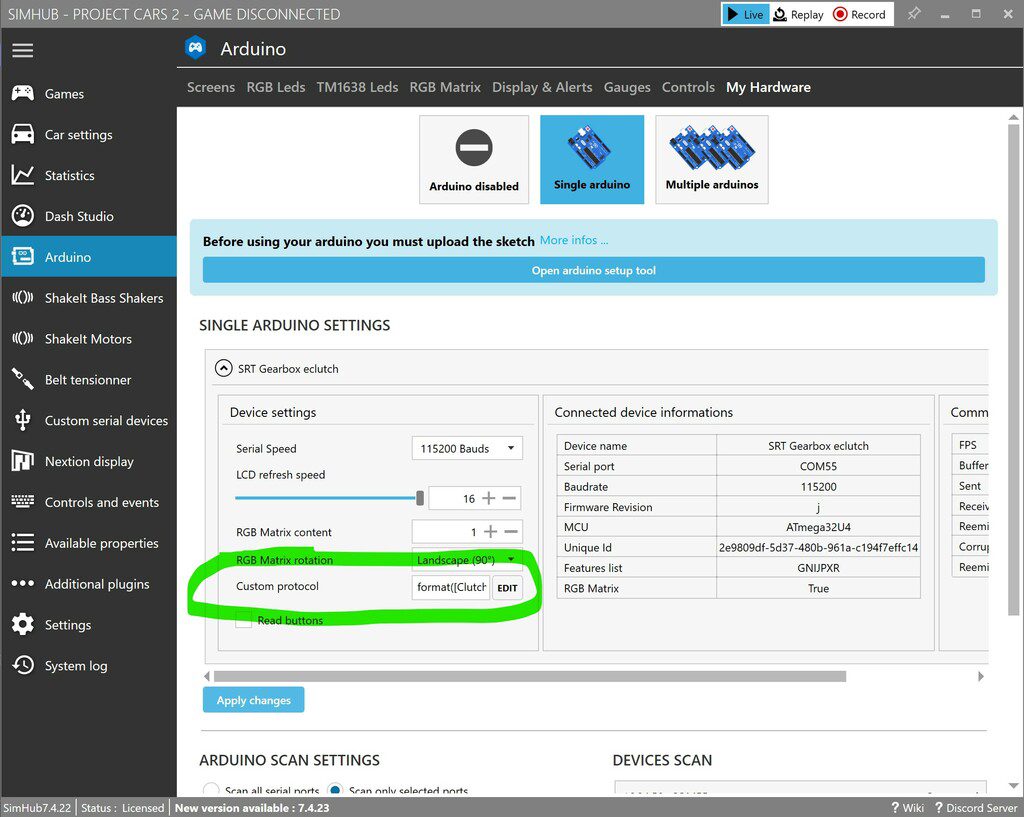
6) Simhub
In Simhub, once the arduino is connected, you must enter the following line of code in the “Custom Protocol” field:
format([Clutch],0)+';'+format([DataCorePlugin.GameRunning],0)+';'


Hi, nice mod, quick question is this compatible with all the clutch or set of sim pedals?
yes it is
Hello I have a srt v9.0 shifter and I’m asking for help regarding clutch mode.
Hello I have a srt v9.0 shifter and I’m asking for help regarding clutch mode.
In the Arduino example Servo>Sweep, it worked normally after A3 modification.
After flushing by modifying Arduino clutch mode, use the Custom Protocol format ([Clutch],0)+’;’+format([DataCorePlugin.GameRunning],0)+’;’
Clutch mode doesn’t work in the game.
Press 13 on Arduino to indicate clutch operation but servomotor not working
Hey, please come on discord so we can help you
I can’t type messages in Discord