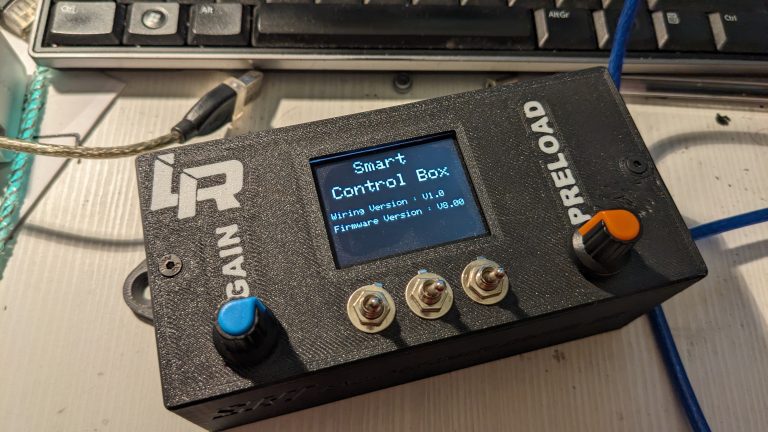
The Smart Control Box is a harness tensioner control box reserved for Pro and Elite contributors.
Summary :
- Presentation
- Caracteristics
- Shopping list
- 3D files
- Wiring
- Drivers settings
- Arduino code and Simhub Configuration
- Assembly instructions
- Signal Filtering
- Additional settings
1) Presentation
The Smart Control Box Uno lets you adjust gain and preload directly, to avoid situations where the tensioner becomes unpleasant (single-seater) or, conversely, where you don’t feel it (slow car).
It also enables you to activate the tensioner on the gas pedal and brake, and switch off everything else.
To put it simply: all you have to do is launch the Simhub software, and everything else will be done using the Smart Control Box.
Exclusive to Pro and Elite contributors.
2) Caracteristics
3) Shopping list
- 1 x Arduino Uno Rev3 (Aliexpress, Amazon)
- 2 x Potentiometer 10k Ohm (Aliexpress, Amazon)
- 3 x switch (Aliexpress, Amazon)
- 1 x 2″ screen TFT (Amazon, Aliexpress)
- 1 x MCP4725 (Amazon, Aliexpress)
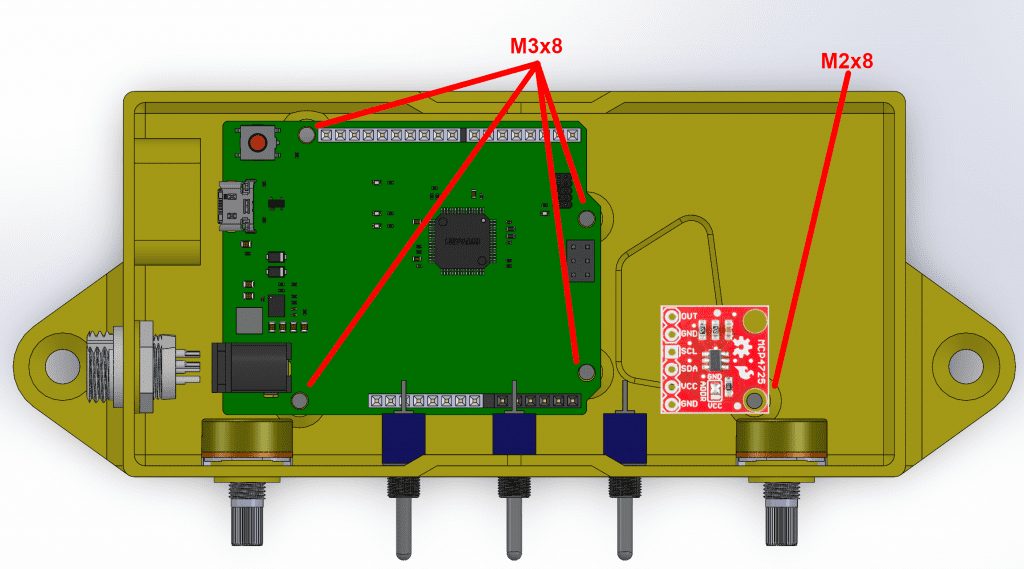
- 8 x M3x8 screw and nut
- 1 x M2x8mm screw
4) 3D files
The 3D files are available on the download page.
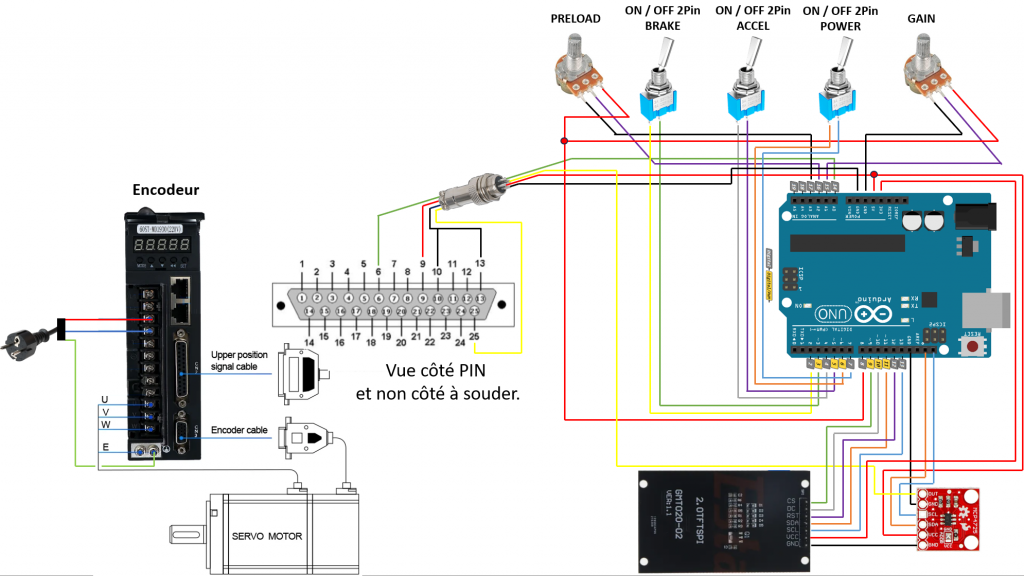
5) Wiring
NOTE: The harness tensioner can be dangerous. At full power, it is used a lot around the collarbones. Therefore, an emergency stop button should be provided.
Make all connections without power.
Perform all tests without any parts on the motor shaft.
Once the tests are done, and the belt is installed, perform the tests in 10% power increments, always being able to cut the power.
Câblage du connecteur DB25 (vous pouvez utiliser les pins du GX12 comme vous le souhaitez).
| Arduino | DB25 connector |
| 5V | 9 |
| GND | 10/13 |
| A0 | 6 |

Switchs, buttons wiring
Switches and buttons are wired on the double row opposite the USB connector:
| Switch : | Arduino : |
| Switch (Throttle) | 4/5 |
| Switch (Brake) | 2/3 |
| Switch (Power) | 6/7 |
Potentiometers :
| Potentiometers: | Arduino : |
| Gain Signal | A1 |
| Preload Signal | A2 |
| Additionnal GND | A3 |
| Additionnal 5V | D8 |
MCP4725 wiring :
| MCP4725 : | Arduino : |
| GND | GND |
| VCC | 5V |
| SDA | SDA |
| SCL | SCL |
| OUT | Pin 25 of DB25 connector |
Screen Wiring
| Screen | Arduino |
| GND | GND |
| VCC | 3,3V |
| RST | 12 |
| DC | 10 |
| CS | 9 |
| SDA | 11 |
| SCL | 13 |
6) Drivers settings :
The parameters are the same as the original ones. We can, however, afford a higher gain on the driver, as it will be adjustable (once again: only increase this parameter once the installation is stable). You can also reduce the preload, as it can be increased (but not reduced) via the potentiometer.
7) Arduino Code and Simhub Profile
To flash the arduino code, you need to use any Arduino IDE. The code is available on the download page.
There’s a test code available: the one that makes the motor pull at different power levels (try it without anything mounted on the motor to be on the safe side).
If it works correctly, you can flash the code in the SRTSmartControlBox folder.
Then in Simhub>Arduino>My Hardware, once the Arduino board is recognized and connected, click on “Edit”, and add the following lines:

format([DataCorePlugin.GameRunning],'0')  +  ';' +

format([AccelerationSurge]*2000,'0')+ ';' +

format([AccelerationSway]*2000,'0' )+ ';' +

'1'
The first number (11) is the gain. If you increase it too much, a message will appear on the control box, indicating that the values received exceed the tensioner’s limit.

If you have an error in the Raw result, please check if the ‘ are correct (no “, or anything else). Please also try while ingame. Often it doesn’t work when the game isn’t launched.
For more information on the messages displayed on the screen, please refer to the GForce manual on this page.
8) Assembly instructions
9) Signal filtering
The raw signal from the simulator may be too “rough”. There are two ways of smoothing it:
a) Driver filtering
The driver has a filter parameter, 188. Values range from 1 (default, no filtering), to 500 (maximum filtering). The driver must be restarted for the new value to be taken into account.
b) Additional filtering
If Pn188 isn’t enough, there’s another parameter that acts as a filter. To activate it, set Pn186 to 1, then modify Pn187. Values range from 1 (no filtering) to 30000 (maximum filtering). The problem with this filter is that it introduces latency, so it’s best to set Pn188 to 500 before using it. A value of 200 already provides very high filtering.
Once again, you need to restart the driver for the new values to be taken into account.
10) Additional settings
The gain: the gain (clamping force) can be adjusted in three places:
- On the driver: PN189 manages force
- In simhub: the first number (11 by default) is also a multiplier
- Via the potentiometer on the control box (multiplier between 0 and 1).
The idea is to find a general setting on the driver and simhub (using a GT4, for example) and then adjust it on the fly using the potentiometer.


Wow, this is brilliant. Thanks for developing it!
Are the TFT and Potentionmeter necessary, or can the control/display be achieved via a Simhub Dashboard?
Best regards
you can control the gain but not the preload. A screen is a nice addition to check if everything is running fine.
thanks