The P1 belt tensioner allows you to feel positive and/or negative Gs in sim racing. It works with FlyPT. It’s a DIY project !
EDIT : The V2 is online !
Summary:
- Presentation
- Caracteristics
- Shopping list
- Control Box
- 3D files
- Wiring
- Driver settings
- Arduino code and FlyPT profile
- Assembly
- Additional adjustements
1) Presentation
What is surprising is the absence of latency and the strength, we even feel the kerbs!
The harness tensioner consists of a harness (4 or 5 points), an servo motor, and an arduino board connected to FlyPT.
The system is precise and reactive, it engages immediately, and we feel the difference of braking between a F1 and a basic car, we also feel the activation of the ABS. It’s the most satisfying solution to feel the G forces in Sim Racing.
This system may not allow to adjust the braking. However, we feel a direct link between the pressure applied on the pedal and the tightening of the belt.
2) Caracteristics
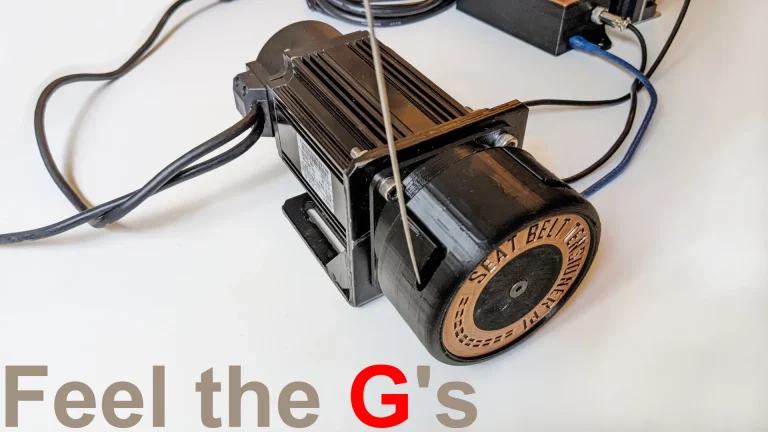
The motor pulls on a cable that wraps around a reel. The cable pulls the belt backwards, which gives the impression of being thrown forward.
There is a casing that is mounted around the reel for safety.
3) Shopping list
Industry&CNC offer a kit (fast shipping, slow shipping) that includes :
- 1 x 80st-M02430 servo motor with a AASD15a driver and shielded cables
- 1 x 80st mounting bracket
- 1 x GX12 4 pin connector
- 1 x Câble 4 fils, 22AWG
- 1 x Shaft coupler
- 1 x bicycle brake cable
It remains then to order :
- Arduino Due (Amazon, I haven’t tested a clone).
- A 4 points seat belt (I tested 5 points, but as a man, I didn’t find it pleasant, you know what I mean?) (Aliexpress).
- 0.1kg of pla to print the drum.
- 4 x DIN912 M3x5mm
- 4 x DIN912 M6x20mm with nuts
- 2 x DIN912 M6x25mm
- 2 x DIN7991 M6x25mm
- 1 x DIN7991 M5x40mm
4) Control box
| Standard Control Box Due | Smart Control Box Due (exclusivité Patreon) | Smart Control Box Uno (exclusivité Patreon) |
| Arduino Due | Arduino Due | Arduino Uno R3 |
| FlyPT | FlyPT | Simhub |
| – Preloading adjustement – Gain adjustement – Switch Power – Switch Accel – Switch frein | – Preloading adjustement – Gain adjustement – Switch Power – Switch Accel – Switch frein | |
| 3D files | Complete documentation | Bêta |
5) 3D Files
All the 3D files are available on the download page. 3D prints can be ordered from the Etsy shop.
The rollers (this system depends a lot on the seat you have, so for the moment, I don’t include the components in the shopping list of this project).
6) Wiring
NOTE: The harness tensioner can be dangerous. At full power, it is used a lot around the collarbones. Therefore, an emergency stop button should be provided.
Make all connections without power.
Perform all tests without any parts on the motor shaft.
Once the tests are done, and the belt is installed, perform the tests in 10% power increments, always being able to cut the power.
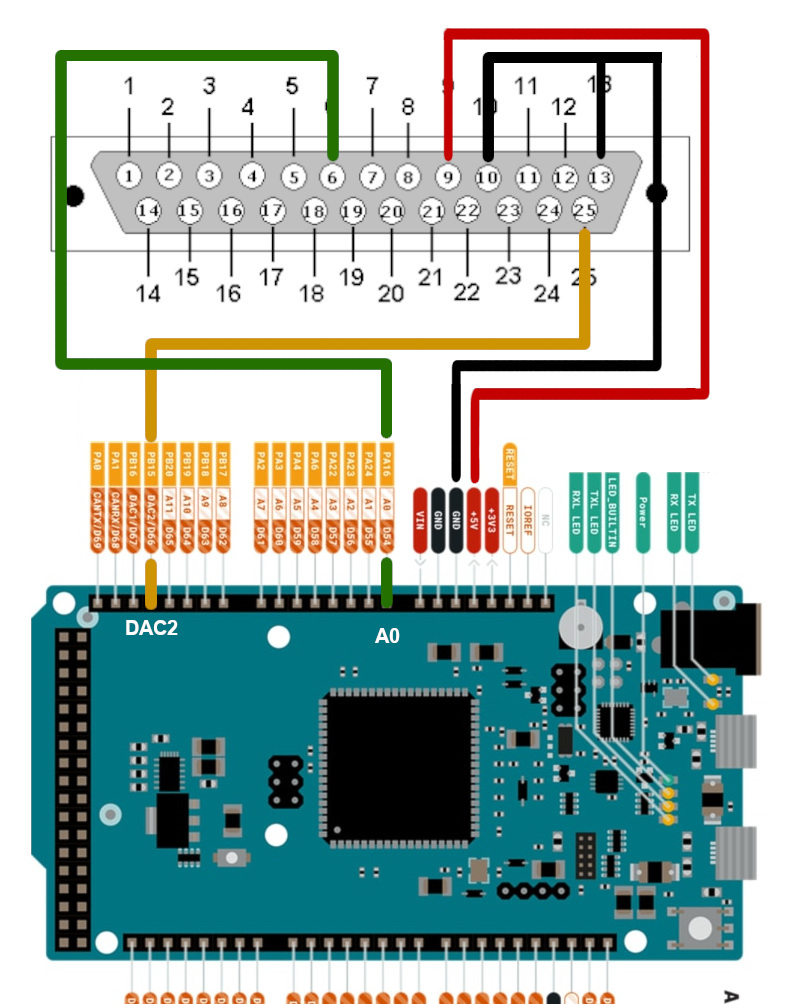
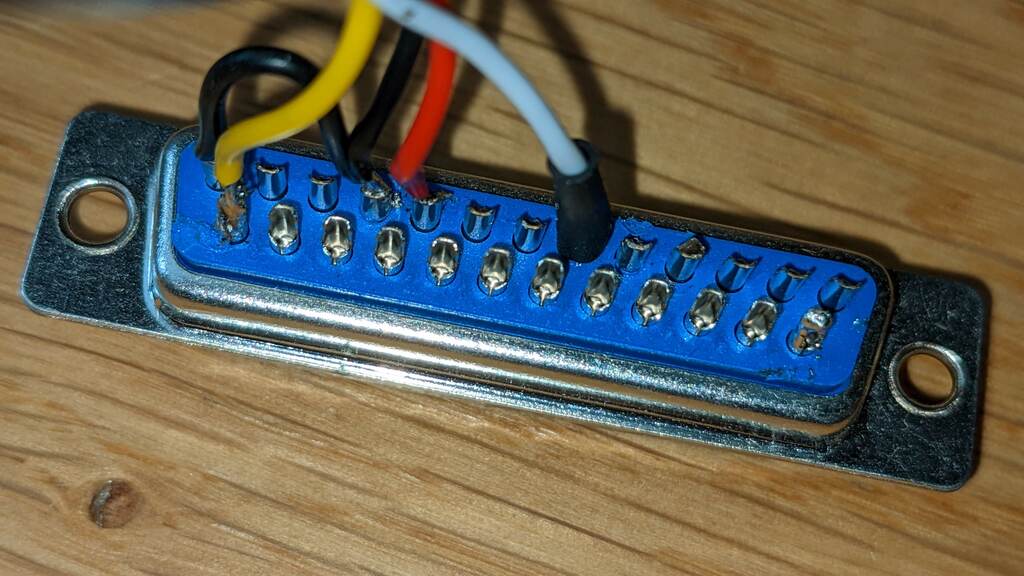
The arduino is connected to the motor driver via the 22AWG cable. The control box contains the arduino and a GX12 aviation connector.
| Arduino | DB25 connector |
| 5V | 9 |
| GND (ground) | 10/13 |
| A0 | 6 |
| DAC2 | 25 |
7) Driver settings
Drivers similar to AASD have 200 parameters, fortunately you don’t need to change them all.
The drivers manual is available here. This video shows how to set the parameters.
I highly recommend testing the engine operation via flypt with the engine disassembled!
| Parameter | Value | Explanation | Comment |
| Pn001 | 4 | Select the right motor, in this case an 80st-M02430 | No need to use a more powerful engine |
| Pn002 | 0 | Motor control mode | 0 : torque mode : we send a torque command |
| Pn003 | 0 | Activate/deactivate the driver | 0: the driver is turned on by the arduino. 1: the driver is always on |
| Pn189 | 30 | Gain: the force of the motor | You can increase the value once the installation is fully functional. |
| Pn190 | -600 | Offset : allows to immobilize the motor on the value 0. This value must be calibrated on your installation, my value may not be the right one for you | This parameter also allows to add a small preload. |
| Pn191 | 0 | Allows to reverse the direction of rotation | 0 : When facing the engine, counterclockwise |
The last three parameters are taken into account by the driver without restarting.
8) Arduino code and FLYPT profile
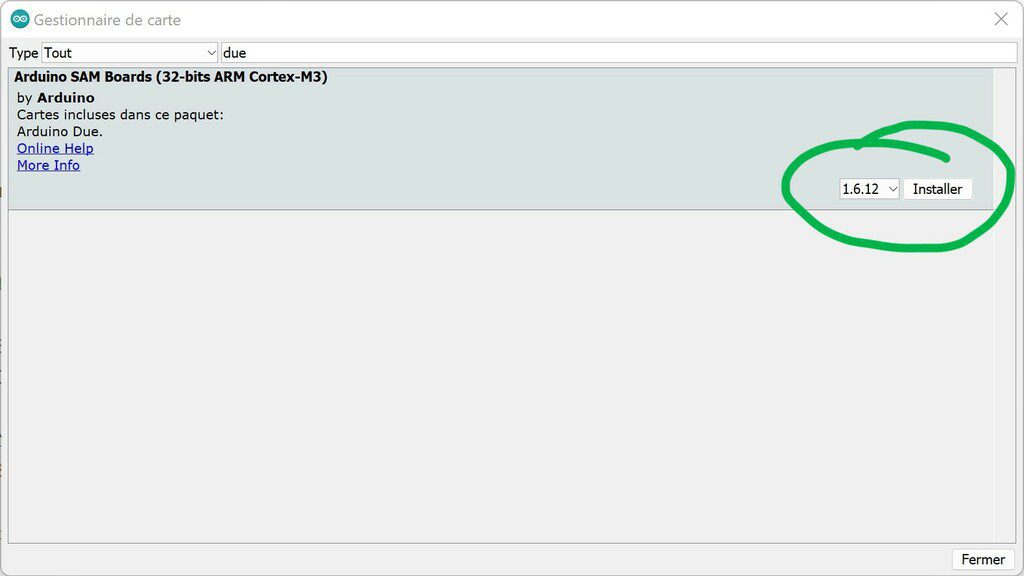
You will need to add the library to manage the Arduino due: Tools > Board type > Board manager > type Due in the search bar and install the “Arduino SAM Boards” package. Then restart the IDE.
Before using the seat belt tensioner, the offset (Pn190) must be calibrated. Flash this test code with Arduino Due (Native USB port) selected: the driver should normally be active (it emits a very slight high pitched noise). If the motor is running by itself, change the parameter Pn190 until the motor is not running anymore, or just pulling very very very lightly on the belt (in my case, I am at -1600).
You can now flash the final code available here, still selecting Arduino Due (Native USB port).
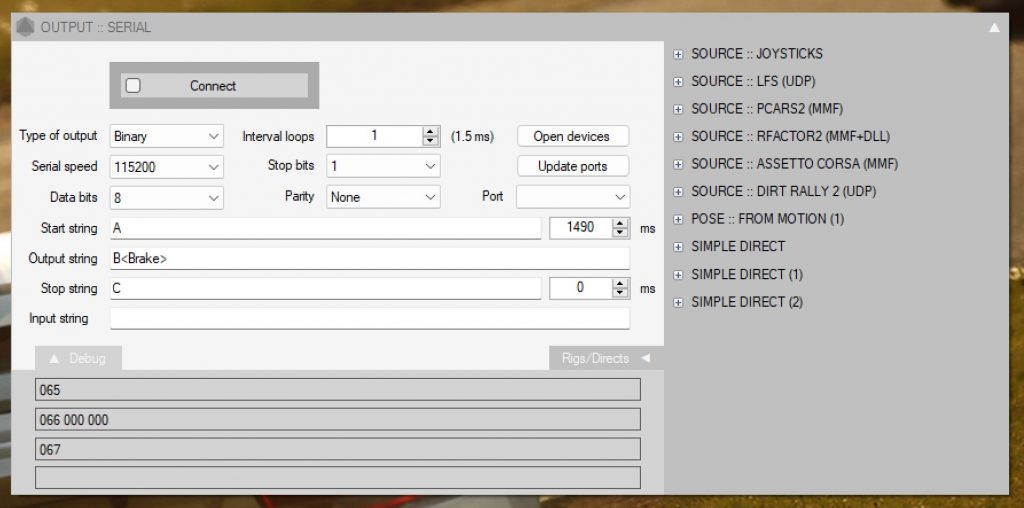
Open the FlyPT profile. Click on Output::Serial > Update Ports, then select the Arduino port. Click on “connect” to connect the Arduino
Then if no source is connected, you can act directly on the slider (blue in this case) in “Simple Direct” to test the tensioner.
Once everything is in place, click on any source, and connect it. For some sources, you will need to make some modifications to the game. More details on the FlyPT website.
To adjust the force, you can act directly on the Pn189 parameter. The smart control box also allows to adjust the gain on the fly !
9) Assembly
The step file is available on Thingiverse if you want to check the full assembly. In the following video we are going to see how to assemble step by step the seat belt tensioner.
10) Additionnal adjustements
A mistake in the settings can cause the system to fail and therefore be dangerous. Until you are used to it, always be careful, able to turn off the power or assisted by another person.
There are three “simple direct”: Accel, Brake, Both. Depending on what you want to choose, change the code in the “ouput string” field of the connect window:


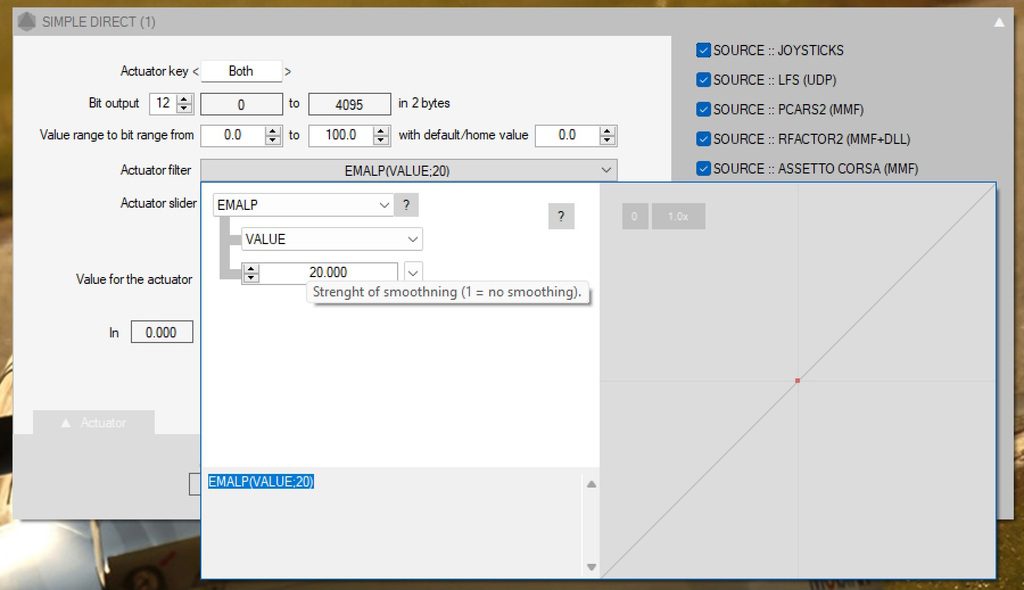
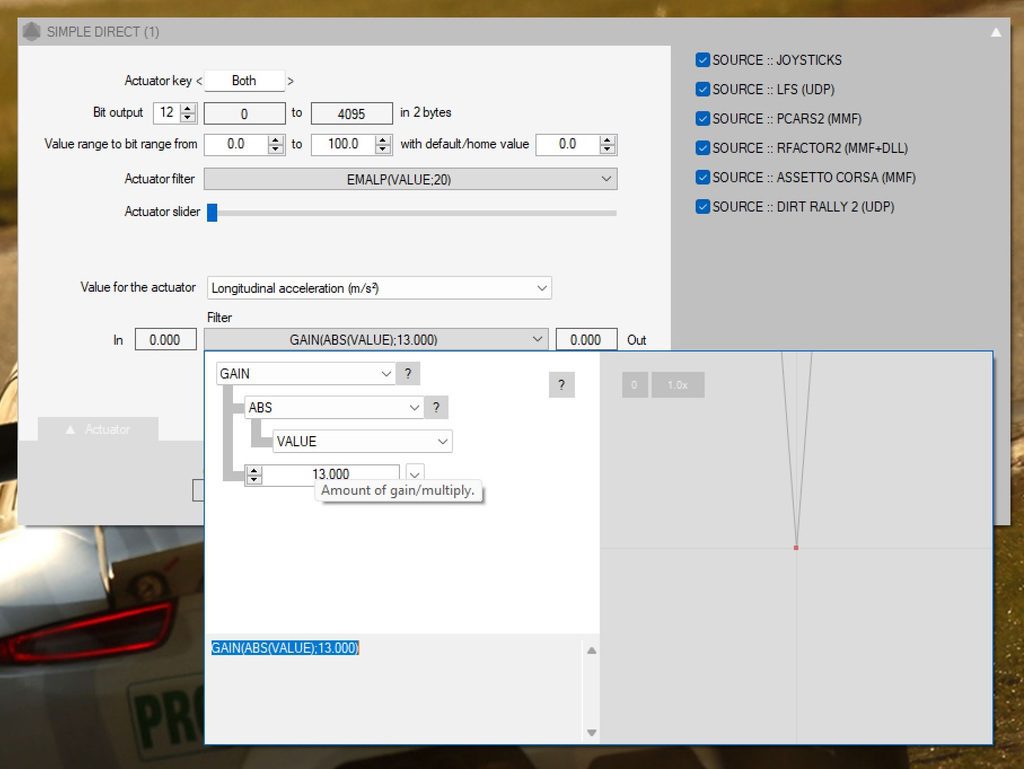
In each “simple direct”, you can adjust the gain, and the filtering:
The higher the Emalp value, the smoother it is (it filters details). I recommend values between 10 and 100.
The higher the gain, the stronger the tensioner serves. I obviously recommend to start with a low gain. Recommended value: between 10 and 20.

Hello Lebois, can you tell if the motor is 220v if so can it be switched to 120v which is what we have here in Canada. I really like the seat belt tensioner kit but if it is only available in 220v that would be a deal breaker, let me know thanks.
Tony
Hi, well those drivers aren’t made to be driven at 110V in theory. You can use a very expensive 110v to 220v converter, or try at your own risk the following solutions here : https://www.racedepartment.com/threads/thanos-amc-aasd15a-6axis-servo-motion-controller.168360/page-12#post-3020752
Hi. What is the benefit compared to the original one with DC motor and PWM board?
It is explained in the vidéo 🙂
It is mostly more reliable.
Hi Lebois, I want try to integrate it in a esp32, just for se if I can add wifi or bt settings. can I ask you .ino file, or at least a part of general code?
here : https://lebois-racing.fr/srt-p1-seat-belt-tensioner#arduino-flypt
Hey man… love your site. Is it worth doing this project over the GT V3 kit?
Thanks bro!
Hey ! Kind of… it’s just 100% reliable while the GT…well… some have no issue, some others do..
hi! would the AASD15a driver allow to use the belt tensioner in the Simracing Studio software?
Hi ! sorry i have no experience with Simracing Studio…
Can this be achieved using simhub ? i dont want more software running on my rig…
I understand but no :/
Hi there, great project! I’m running a rig with GT7 on a PS5 with simhub for wind and shakers. Can I integrate this tensioner with my setup?
Thanks
not currently
In fact, I think I will work on this finally
That would be great! Another thought: to increase the safety of the system (eg if children or others who are unfaniliar want to use it) it might make sense to replace the current bike wire with a strong spring pulling down and have the the motor and cable pulling up instead of down on the belt attachment. That way one could set the max bearable (and therefore safe) tension by tightening the belts as much as you want when you get into the rig. The servo would then relieve tension instead of add it (ie the input signal to the motor would be reversed to increase force when decreasing G load).
For those waiting for a Simhub integration:
https://lebois-racing.com/smart-control-box-for-simhub/
I Currently own a diy sfx100 with Thanos amc, and I ordered your kit from Aliexpress like a month ago, which should arrive very soon.
I am interested to ask if it’s possible to directly connect to the Thanos amc and use simhub for the seat belt tensioner.
Thank you.
Not sure… I guess there should be a way but it can be tricky..